Tired of not having a home Kubernetes cluster? Probably not, but in case you are really bored here I show you how to do it from scratch using official up-to-date documentation.
The prerequisites for this homelab setup are: a home and some raspis, in my case I will use 3 Raspberry Pi 5.
- 1. Understand the scenario
- 2. Setup the Raspberry Pis
- 3. Install Ansible
- 4. Build the K3s cluster via Ansible
1. Understand the scenario
Although I have already assumed that my career as an artist is doomed to failure, I have allowed myself the luxury of sketching what the scenario we intend to set up will look like.
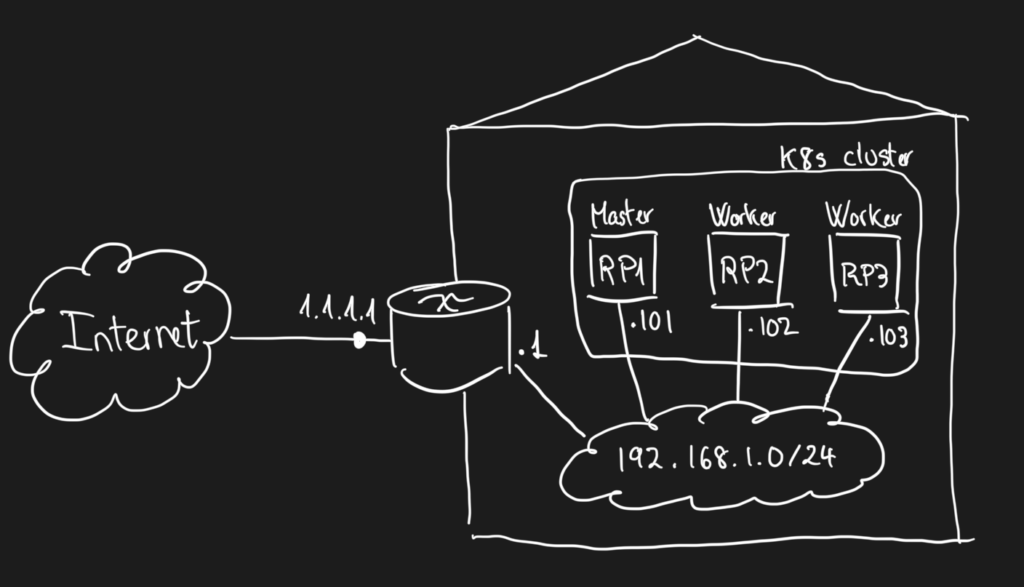
Our fake public IP is 1.1.1.1 and all the Raspberry Pis will be living in the 192.168.1.0/24 network. RP1 will be the Kubernetes control-plane with IP 192.168.1.101 and RP2 & RP3 will be the worker nodes with 192.168.1.102 & 192.168.1.103 respectively.
2. Setup the Raspberry Pis
Follow the official documentation for installing Raspberry Pi OS Lite (64-bit) with Raspberry Pi Imager. During OS customization, remember:
- Setting the hostname so other devices in the network can reach them using <hostname>.local
- In case you don’t have ethernet cables, input the WiFi credentials from your network.
- Enable SSH with public-key authentication so you login passwordless. We will need this later.
3. Install Ansible
We will use our working station as the Ansible control node and the Raspberry Pis will be our managed nodes. Follow this guide for installing Ansible in your PC and make sure both control and managed nodes meet the requirements.
4. Build the K3s cluster via Ansible
We will use K3s for this cluster since it’s a lightweight Kubernetes distribution great for ARM architectures and allows multi-node cluster. I have tried first with MicroK8s but I had to remove the cluster due to disk issues, but overall it was a great choice. I also gave a chance to K3d but I was struggling when creating the multi-node cluster, that’s why I decided to go with K3s.
There’s a section in the K3s documentation that shows how to create a multi-node cluster via Ansible. You will get redirected to a GitHub repository which is pretty updated, so go ahead and follow carefully the readme instructions.
Congratulations, your K3s cluster is now ready to break with whatever you want to deploy! As a matter of fact, this website is running in my own K3s cluster.
Muchas gracias for your time and I will be adding more posts on how to expose your Kubernetes applications to the internet securely, manage certificates, monitor performance and much more. See you!
Leave a Reply